e. Monitor the Filesystem and check auto import and lazy loading
In this section you will log in to the updated cluster, launch a job and check the mounted lustre filesystem. You will check the contents of the file system and data repository in S3. This will help understand the HSM capabilities and feature of FSx for Lustre.
- Go to your cloud9 terminal and run the following command to retrive the name of the SSH Key you created in lab1.
source env_vars

echo ${SSH_KEY_NAME}
- Log in to the cluster
pcluster ssh -n hpc-cluster-lab --region ${AWS_REGION} -i ~/.ssh/${SSH_KEY_NAME}
Continue connecting to the head node of the cluster by saying yes
- The Lustre Filesystem is mounted only on the Compute Nodes. Submit a Slurm job to allocate a compute node.
srun -N 1 --exclusive --pty /bin/bash -il
It will take around 5 mins to get your compute node.
- Confirm that the lustre filesystem is mounted on the compute node and is available.
df -h /fsx
- You have now successfully mounted the file system. The next step is to verify the data respository association and run some HSM commands. Go into the fsx for lustre directory and into the data repository path to verify the files uploaded into s3 bucket in section b are seen on the file system. –> This verifies auto import from S3 to FSx for lustre. You should see the test data SEG_C3NA_Velocity.sgy you uploaded in the S3 bucket on the FSx Lustre filesystem.
cd /fsx/hsmtest
ls -lrt
If you do not see the files that you uploaded to the S3 bucket, the Data repository association (DRA) is not created. Check Step 3 in c. Create data repository association between S3 and FSx for Lustre. Re-try after successful DRA creation.
- Lazy Loading FSx for lustre uses the lazy load policy where the meta data is visible when you look at the data repository path, however the data is copied to the filesystem only at the time of first access and subsequent accesses will be faster. You can see this by running the command
lfs df -h. We know that the actual size of the file uploaded into S3 is 455MB. However the space used on the file system before access is 7.8MB of metadata. You can also runlfs hsm_state /fsx/hsmtest/SEG_C3NA_Velocity.sgy. It confirms that the file is released but is archived.
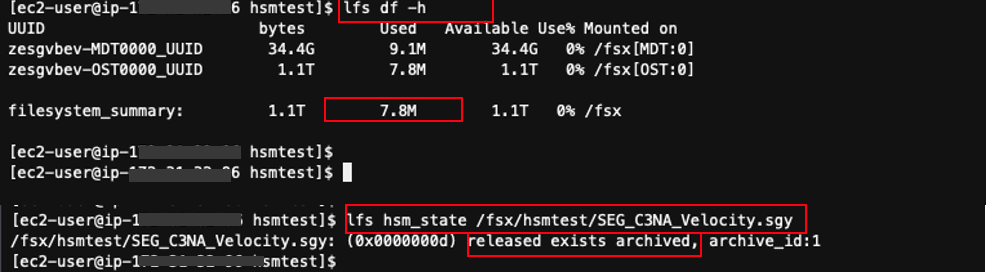
You should see that the file is released, i.e. not loaded.
- Now, check the size of the file
ls -lah /fsx/hsmtest/SEG_C3NA_Velocity.sgy

As shown above, the file size is about 455 MB.
- Next you will access the file and measure the time it takes to load it from the linked Amazon S3 bucket using the HSM. You write the file to tempfs.
Use the following command to retrive the file
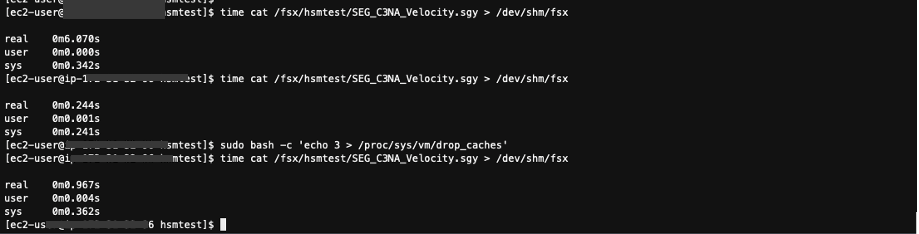
time cat /fsx/hsmtest/SEG_C3NA_Velocity.sgy > /dev/shm/fsx
It should take about 6 seconds to retrieve the file.
Run the command again and see the access time:
time cat /fsx/hsmtest/SEG_C3NA_Velocity.sgy > /dev/shm/fsx
This time it should take lesser about .2 seconds only.
The new access time is a bit too fast because the data has been cached on the instance. Now, drop the caches and repeat the command again.
sudo bash -c 'echo 3 > /proc/sys/vm/drop_caches'
time cat /fsx/hsmtest/SEG_C3NA_Velocity.sgy > /dev/shm/fsx
This access time is more realistic: at about 0.9s
Review the File System Status
- Next, look at the file content state through the HSM. Run the following command
lfs hsm_state /fsx/hsmtest/SEG_C3NA_Velocity.sgy
You can see that the file state changed from released to archived.
Now, use the following command to see how much data is stored on the Lustre partition.
time lfs df -h
Do you notice a difference compared to the previous execution of this command? Instead of 7.8 MB of data stored, you now have 465 MB stored on the OST, you may see slightly different results.

- Next you will release the file Content. This action does not not delete nor remove the file itself. The metadata is still stored on the MDT.
Use the following command to release the file content:
sudo lfs hsm_release /fsx/hsmtest/SEG_C3NA_Velocity.sgy
Then, run this command to see again how much data is stored on your file system.
lfs df -h
You are back to 7.8 MB of stored data.

Access the file again and check how much time it takes.
time cat /fsx/hsmtest/SEG_C3NA_Velocity.sgy > /dev/shm/fsx
It should take around 5-6 seconds like we checked in step 11. Subsequent reads use the client cache. You can drop the caches, if desired.
In the next section you will test auto export feature of the FSx-S3 data repository association.